The first question is How to start a YouTube Channel and start earning? So, we can say that youtube allows to creators so, they can create their own YouTube channel and create any content they want and share it on your channel.
It is an amazing fact that at this time YouTube is not one of the biggest audience generation tools in the World with over 1.86 billion users. If we talk about its ranking so YouTube is the second largest search source on the internet.
You will be surprised to know that there are 38 million channels that are active, and 500 hours of content are uploaded every minute on YouTube. If you have one million subscribers and 22,000 content creators, this data isn’t so tough but for someone who’s just starting his new YouTube channel, it is so difficult.
No doubt, YouTube is an ongoing investment. To get the best outcome you have to work to monetize it. To start a YouTube channel, you just need to sign-up process takes a few seconds, but despite it, we’re talking about to create-an-account-and-go fast.
But it’s not enough to add your channel name and upload a profile picture. There are more things to do.
You have to follow through on the most important steps it’s time to put on the direction of your goal How to start a YouTube Channel. Here are some important steps you need to start a YouTube channel.
In this guide, I’m going to cover all the important steps process which can be very useful to you for starting a YouTube channel, so that you can start to upload your videos and get more views this year.
Steps To Start A Youtube Channel
So let’s get started with these beneficial a guide step by step:
- Create a YouTube channel with a Google account
- Create your channel name
- Customize you channel
- Create video content
- Best Equipment
- Upload your first video
Step 1: Create Your Channel With Google
You just need to use your Google account to create your channel on YouTube. You do not need to worry about doing any specific phone or computer to create your account, you just need to follow these simple and useful steps, and your channel is ready.
First of all, you’ll need to sign in to YouTube with your Google account.
Then head to YouTube.com and there will show an option of “Sign In” and click on the “Sign In” option, after that, you’ll get prompted to enter your Gmail Id and password. Put your Gmail Id and its password.
But if you already have an account on YouTube, now you just need to click on your user icon from the right side corner of your screen. Then click on the option of “Settings” from the drop-down menu.
This drop-down menu is for your Google Account and also your YouTube account.
The next thing you have to do, you’ll get redirected to your account overview. Select the option of the “Create a new channel” link under the “Your YouTube channel” tab.
Step 2: Create your Channel Name
The next step to start a YouTube channel is to create your channel name first. You can use your brand’s name or another name as your YouTube Channel name. Your channel name is a vital step to creating your channel and for success on YouTube.

It’s just like a business card because it shows users who you are and what your video channel will be about or Content. It is a fact that there are more than a million YouTube channels at this time, and that number of channels is growing every day.
If you want to make your channel stand out in the crowd, the name of your channel should be searchable and unique. Your YouTube channel’s name should be the potential to get more views, subscribers, likes, and shares.
Consistency with your name is also another important factor to build up the name of your brand. So, if you have already a famous channel or you are a well-known influencer and your name is your major draw, it’s a very good idea to keep your name for your YouTube channel.
Here are some other useful tips which can help you to choose your channel name:
- Always choose a name of your channel that’s easy to remember.
- Remember to pick a name that resonates with a unique audience.
- Make this name relevant to your niche or content.
- Always use capital letters to make them more readable.
The audience will recognize you by your YouTube channel name so, it’s very important, to take your time to consider which name is more relevant to your channel. YouTube allows you to change your channel name in the future, you can use a temporary name for now.
Step 3: Customize Your Channel
After adding your channel name and selecting the “Create” option, now you will get redirected to your final channel page. Now you can start your channel by uploading your videos right away.
However, you just need to customize your channel and upload your channel art or content first.
Just click on the option of “Customize Channel” to begin customizing your channel.
The process of Channel customization has three major categories:
- Basic Info: Add your channel name, description, URL, and links to the sites you want to share with your viewers
- Branding: This includes uploading your profile picture, banner image, and video watermark.
- Layout: The layout section will help you present your video content in the best possible light.
Let’s customize all of these elements by starting with the Basic Info.
1. Add Basic info
Let’s start this process by clicking on the “Basic Info” section.
By clicking the Basic Info section, you can add your channel description, links, your contact info, and more.
Channel description will appear in the about section of your channel, search results, and Google search results. The description represents who you are, what is your personality, which ideas you want to give your audience, and what they expect from you as a Youtuber.
The next step is that you must have your Channel URL which is the standard web address for your channel.
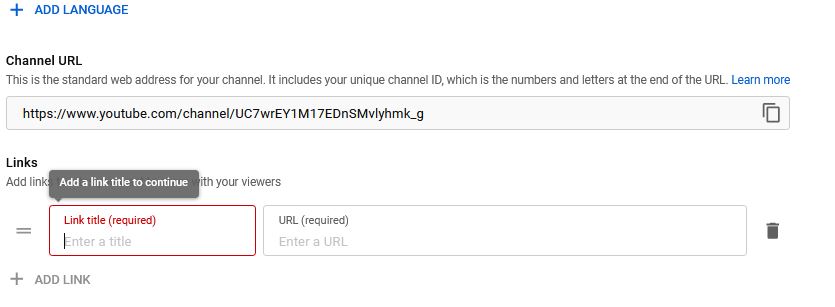
Your original URL will definitely include your unique channel ID. If you want that your YouTube channel has a professional touch, you need to take some time to customize the default channel URL.
You can also send viewers to your other channels by adding links. That links will appear over your banner at the bottom.
2. Branding
Now you need to add branding elements to your channel, i.e. your profile picture, banner image, and video watermark. You can add all of these elements by clicking the “Branding” section.
Profile Picture:
It is said that the first impression is the last impression. So, it would be never wrong to say that your profile picture on your YouTube channel is a great opportunity for you to engage with the public, create a first impression, and showcase your brand. The profile picture appears everywhere your channel appears on YouTube in the world, whether next to your videos or comments.
Click “Upload” to upload a profile picture from your gallery. You can also adjust the image size and click “Done,” and then click “Publish.” Your profile picture is uploaded.
Banner Image:
As we know that our banner image appears across the top of your channel. However, it’s a necessary part of your channel since it gives viewers a visual sense and a professional look of your channel.
The Cover photo should include these essential elements:
- The color scheme should match your brand.
- Solid value proposition
- The links to your other social networks, blog, page
Remember, your banner image will appear differently on desktops, mobile devices, and TV displays. Big images can be cropped and then you can set them in the banner image. YouTube recommends users to put at least 2048 x 1152 pixels with an aspect ratio of 16:9 and 6MB or less for optimum results.
Video Watermark:
Basically, a YouTube watermark is a graphic logo that contains the channel name, video name, or other info related to your channel.
As we all know that watermark appears at the bottom of the right corner in uploaded videos and also during live streaming. Users can also use it to subscribe to your channel.
You just have to upload the watermark as you upload your profile picture and banner, and then press the “Publish” button. However, you’ll have to set your display time before clicking the publish button.
You can display your watermark at the following display time:
- When your video is about to finish, a watermark can be displayed for the last 15 seconds of the video.
- Custom start time: It will appear at any time you choose.
- Entire video: it would Display throughout the whole video.
However, YouTube suggests that the watermark should be less than 1MB in size and a minimum of 150×150 pixels. And you can use any online free or paid services of photo editing and also use Canva to create all your branding elements.
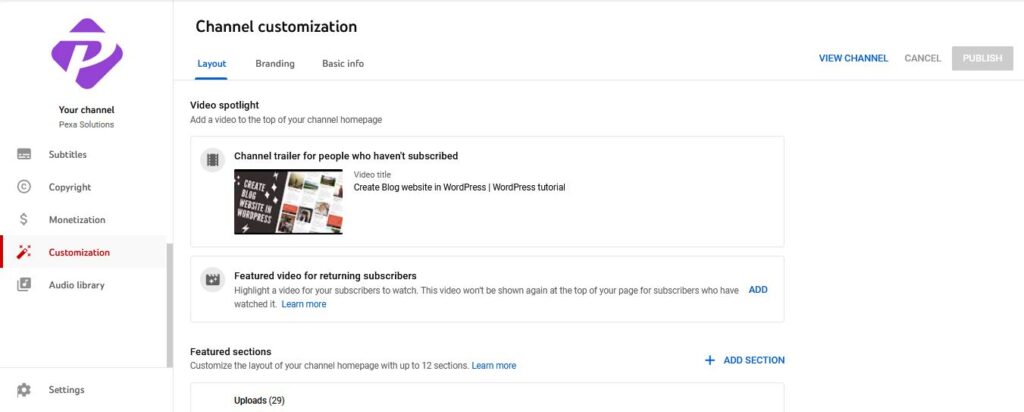
3. Layout
Finally, you have to come towards the “Layout” tab that allows you to select and manage what viewers see when visiting your channel.
Firstly, you need to add a Video Spotlight. Video spotlight is the main video that users see when they first click and open your channel. The Video Spotlight section allows you to showcase two types of videos, depending on if the viewer is a subscriber or not.
For those audiences who aren’t subscribed to your channel, you can add a channel trailer.
The Channel trailer should:
- Highlight (Content) what you create.
- Specify what viewers can expect from your channel.
- Encourage viewers to subscribe to your channel.
For returning subscribers, you can add any featured video to your channel.
You can change or delete these videos at any time you want by hitting the 3-dot menu.
- Next, you can add featured sections.
- These featured sections allow you to customize the homepage of your YouTube channel homepage. You can categorize videos and make playlists in different sections for better visibility.
- YouTube uses multiple sections to group its videos, making it easier for subscribers to find videos according to their interests.
- By clicking “Add Section” you can choose if you want to feature videos, playlists, or channels.
- By hitting “Uploads” you can add any new video that you want to upload to your channel.
- By pressing Playlists, you can highlight already curated by you or other creators.
Infect, Channels let you showcase your collaborators or other channels. YouTube allows you to add up to 12 sections on your channel homepage. This structure helps you to manage your content. It is the best thing to do if you have many videos on your channel.
Step 4: Create Video Content
Creating your video content is the main part of start a YouTube Channel. Once you’re ready with your channel, now it’s time to create powerful video content.
Your creating content should be so attractive that will get viewers hooked and lead them to watch your other videos.
But you need to understand some basic factors before creating video content, start with identifying your audience and then choose the type of videos you want to create.
Identify Your Audience
The fact is that YouTube has about 2.3 billion active users in the world, which makes YouTube the largest user-generated video-sharing online platform.
Try to Target your audience that’s not mean YouTube is trying to get everyone to see your content but rather it targets a smaller group which are interested in this content and gets them to like and share your content.
It is so vital to identify your target audience and what type of information they expect from you. It helps you to develop better topics for your new videos.
Try to understand What Your Audience Expects from You.
Now you just need to understand what your audience actually expects from you. You will never succeed to grab the attention of the audience if your content is not relevant to them, or worse.
So, you need to determine their primary goals first. Are they looking for fitness advice? Maybe they want to know the useful tips to lose weight?
If they find the content of their interest they’ll also keep coming back to your channel.
Pick the Video Topic
Here are the most popular topics in YouTube videos:
- Product Reviews
- Video Tutorials
- Educational
- Interview
- Narratives
- Reactions
- Beauty
- Parenting and many more.
Now it totally depends on you which topic you will pick according to your interest.
Step 5: Choose the Best Equipment
It is fact that Equipment depends on the type of video. But you need additional equipment to create high-quality videos for your YouTube channel.
Here is some best equipment you need to create quality video:
Camera for Filming

Viewers sometimes don’t like low-quality videos. You can use a simple point-and-shoot camera to shoot quick videos in HD and DSLR cameras for a professional look.
Microphone for Audio
The quality of your sound should be good because the Audience cannot stand the low-quality sound. So if you made a set of using your camera or system so you should built-in microphone, make sure you’re staying between three and four feet from the camera at least.
Lighting
A simple change in lighting can put a good impact on the quality of your video. When you shoot videos in poor lighting, you create a low-quality video.
You can use a two-point lighting system, LEDs or fluorescent bulbs, and ring lights to create a high-quality video.
Video Editing
Video editing is the backbone of video. It doesn’t matter what is your content, after creating video content it must require some kind of editing.
Take it easy, there is a useful guide for you to learn, how to edit YouTube videos so that you can make your videos perfect. There is a lot of video editing software. You just need to choose one of them.
By using this software you can make a professional video. You just need to edit your video with the use of transitions, music, or even effects. You need to add an eye catchy thumbnail, compelling title, tags, and video intro and give a professional look to your YouTube video.
Step 6: Upload your first video
Now you have much info research about your first video, and if you have your channel trailer under your belt. Now it’s time to take action.
Once you have done making and editing, now your video is ready, and it’s time to upload a YouTube video. You can see the upload option at the top right of the screen when you log into your account.
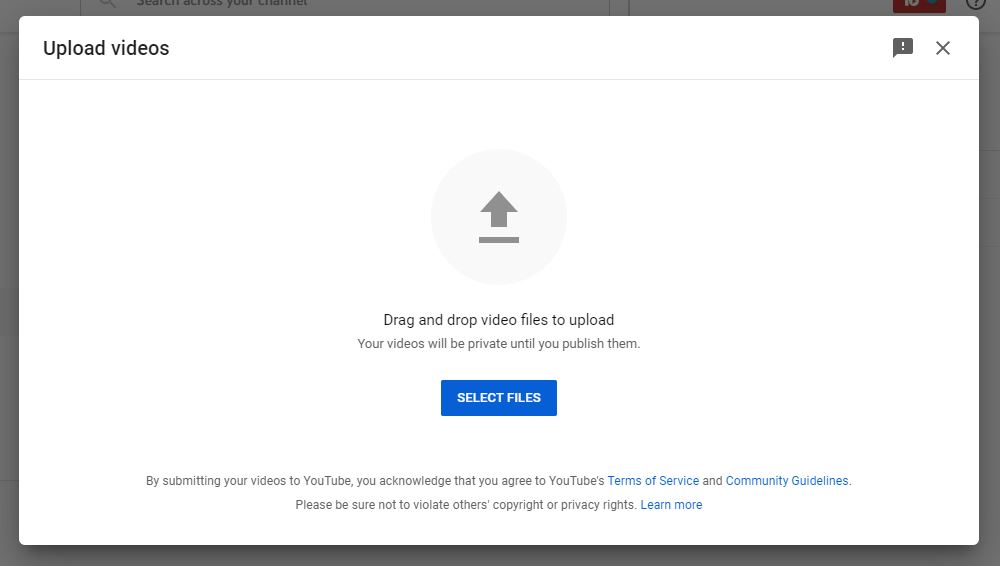
We have two approaches to uploading your first YouTube video. You can either Live Stream on YouTube or you can also upload a video file.
Go to YouTube Studio and then press the “Create” option from the right-most section. Then click the “Upload Video” button to upload a video from your gallery. Now you need to choose one file to upload at a time.
You can close the upload screen after uploading the video and your video is automatically saved as a draft on your Videos page.
Conclusion
Our guide includes everything you need to start a new YouTube channel. You just need to follow our guide step by step carefully so that you can make an official YouTube channel and start sharing your thought and interest through your content. You can also ask the viewers to subscribe to your channel and like, and share your videos. It is a unique form of communication with viewers. These tips can boost subscribers. This step-by-step process to create a channel of your own yourself is so easy.

